
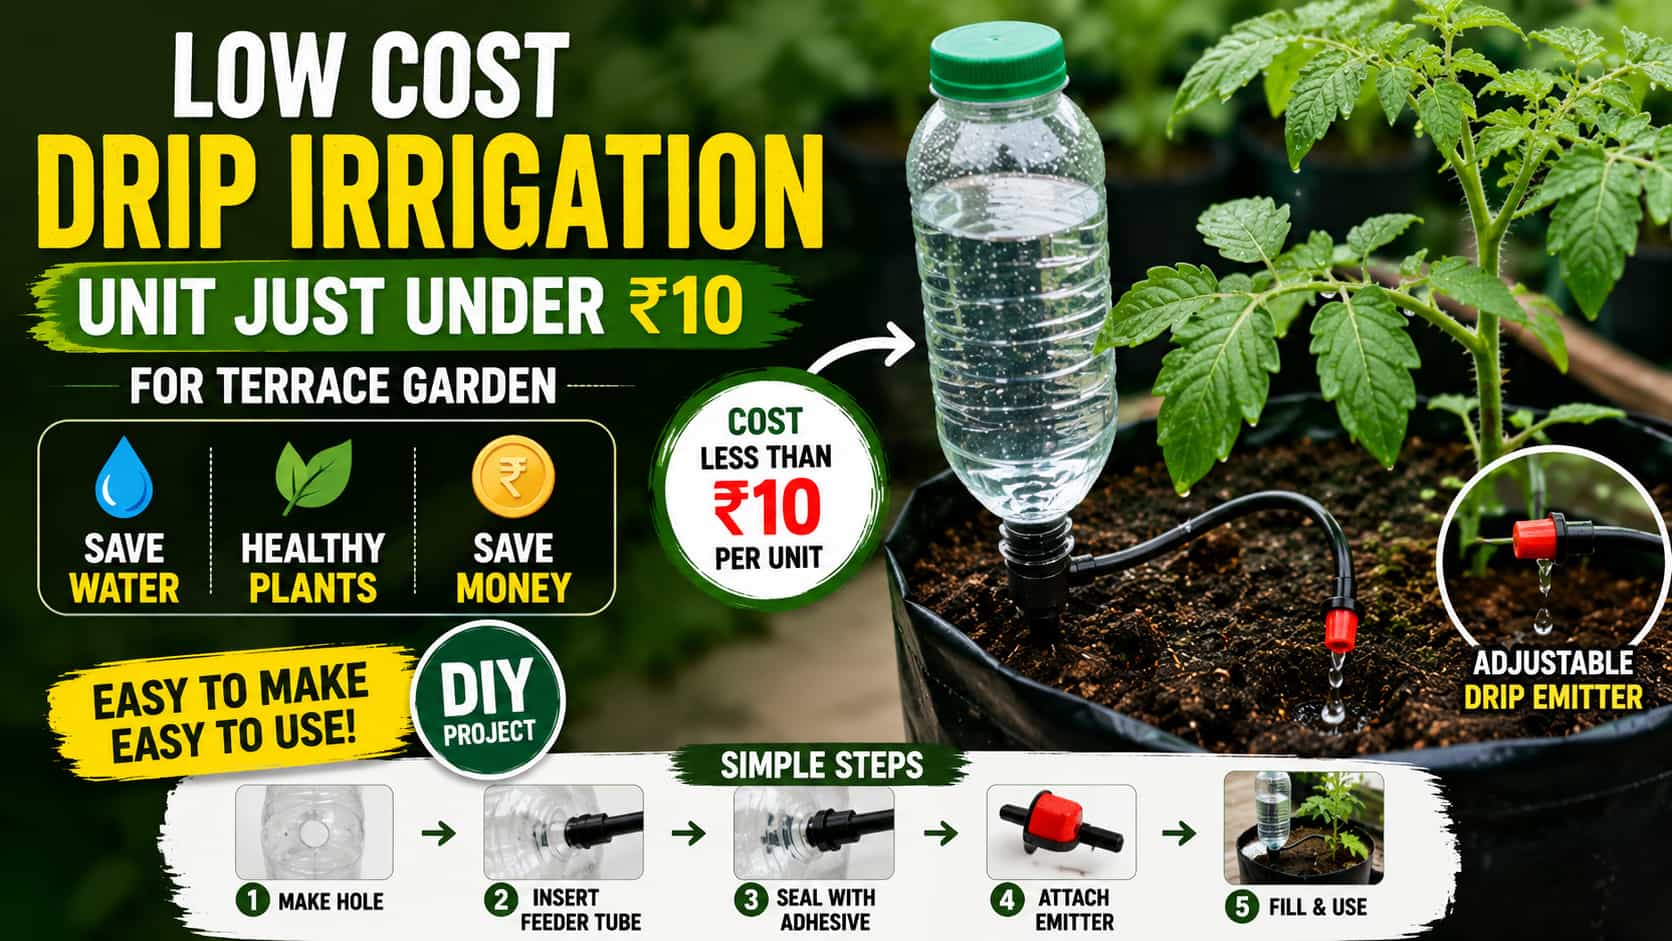
Watering plants regularly during summer can be challenging, especially for terrace gardeners with multiple grow bags and containers. A low-cost drip irrigation system made using a plastic bottle can help save both water and money, while ensuring plants receive a steady supply of moisture.
This simple DIY project costs less than ₹10 per unit and can be assembled using easily available materials. It works like a miniature drip irrigation system, making it ideal for home vegetable gardens, terrace gardens, and balcony plants.
💰 Why Use a Low-Cost Drip Irrigation System?
Instead of watering plants manually several times a day, this simple irrigation unit slowly releases water directly to the root zone.
| 🌿 Benefit | 📋 Description |
|---|---|
| 💧 Saves Water | Delivers water slowly with minimal wastage |
| 💰 Budget Friendly | Costs less than ₹10 per unit |
| 🌱 Better Plant Health | Maintains consistent soil moisture |
| 🪴 Perfect for Grow Bags | Ideal for terrace and kitchen gardens |
| ⏳ Saves Time | Reduces the need for frequent watering |
🛠️ Materials Required
Most of the materials are inexpensive and easily available.
| 🧰 Item | Purpose |
|---|---|
| 🥤 1L or 2L Plastic Bottle | Water reservoir |
| 🔹 4 mm Drip Feeder Tube | Carries water from the bottle |
| 💧 Drip Emitter | Controls water flow |
| 🧴 Adhesive (Fevikwik/Fevibond) | Prevents leakage |
| 🔩 Small Drill or Nail | To make a hole in the bottle |
🔧 How to Make It
Follow these simple steps to build your own drip irrigation unit.
1️⃣ Prepare the Bottle
Use a clean 1-litre or 2-litre plastic bottle.
Make a 3 mm hole near the bottom side of the bottle.
2️⃣ Install the Feeder Tube
Insert the 4 mm feeder tube into the hole.
Seal the opening with adhesive to prevent water leakage.
3️⃣ Attach the Drip Emitter
Connect the emitter to the feeder tube.
Allow the adhesive to dry for 3–4 hours before using the system.
4️⃣ Fill the Bottle
Cut the top portion of the bottle.
Fill it with:
- 💧 Clean water
- 🌱 Liquid organic fertilizers (optional)
5️⃣ Adjust the Water Flow
Rotate the emitter knob to control the dripping speed.
Place the bottle beside the grow bag or container so water drips slowly near the plant roots.
🌿 Where Can You Use It?
This simple irrigation unit works well for:
| 🌱 Suitable For | ✅ |
|---|---|
| Grow Bags | ✔️ |
| Vegetable Pots | ✔️ |
| Terrace Gardens | ✔️ |
| Balcony Gardens | ✔️ |
| Kitchen Gardens | ✔️ |
💡 Tips for Better Results
- 🌤️ Keep the bottle in a shaded position whenever possible.
- 💧 Refill the bottle before it becomes completely empty.
- 🧼 Clean the emitter regularly to avoid clogging.
- 🌱 Use diluted organic liquid fertilizers through the bottle for feeding plants.
- 🔄 Adjust the flow according to weather conditions and plant size.
🎥 Watch the DIY Video
Our Krishipadam YouTube video demonstrates the complete process of making this low-cost drip irrigation unit using simple household materials. The video also shows how to adjust the emitter and use the system effectively in grow bags and containers.
📚 Related Gardening Guides
You may also like:
- 🐟 Fish Amino Acid (FAA) Organic Fertilizer
- 🧅 Onion Peel Fertilizer
- 🌿 Wick Irrigation System
- 🥬 Terrace Vegetable Gardening Tips
⭐ Why Try This DIY Project?
| ✅ Feature | 🌿 Advantage |
|---|---|
| 💰 Under ₹10 | Extremely affordable |
| ♻️ Reuses Plastic Bottles | Eco-friendly solution |
| 💧 Conserves Water | Reduces water wastage |
| 🌱 Easy to Build | No technical skills required |
| 🪴 Great for Home Gardens | Ideal for beginners |
🌱 Conclusion
A low-cost drip irrigation unit is one of the simplest and most effective DIY solutions for terrace gardeners. Made from a recycled plastic bottle and a few inexpensive drip irrigation components, it provides a slow and controlled water supply that helps conserve water while promoting healthy plant growth. Whether you’re growing vegetables in grow bags, pots, or containers, this budget-friendly irrigation system is an excellent addition to your home garden.